
Last week I got this beauty in! A vintage Ampeg Gemini II amp, a workhorse in a local studio (Woodstock Recording Studio, Enschede / IG). It is now blowing fuses. Let’s open it up!

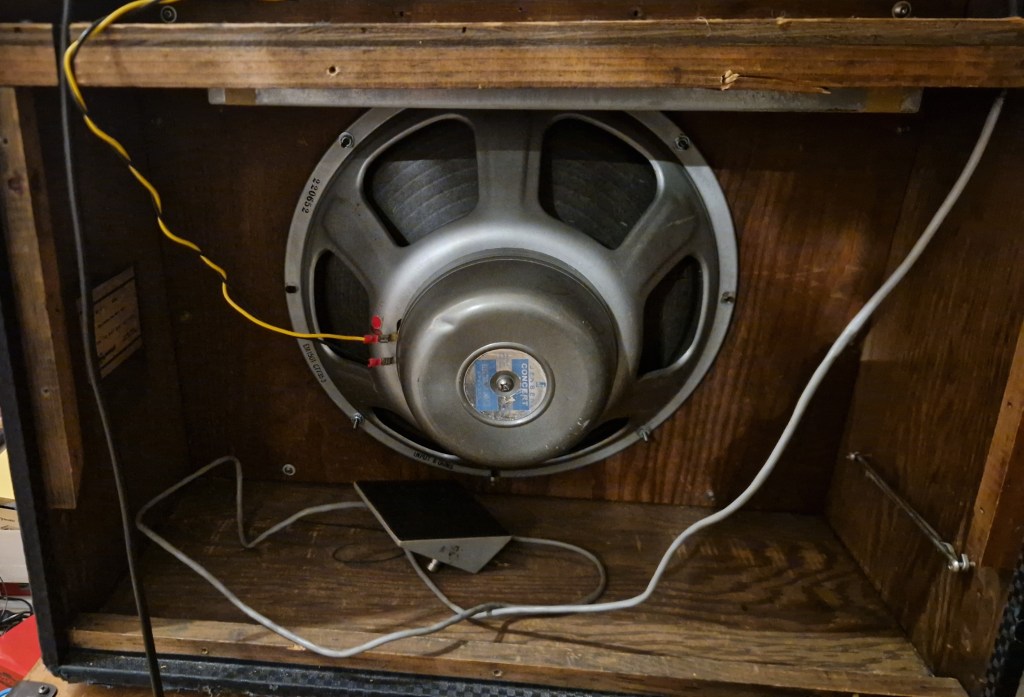
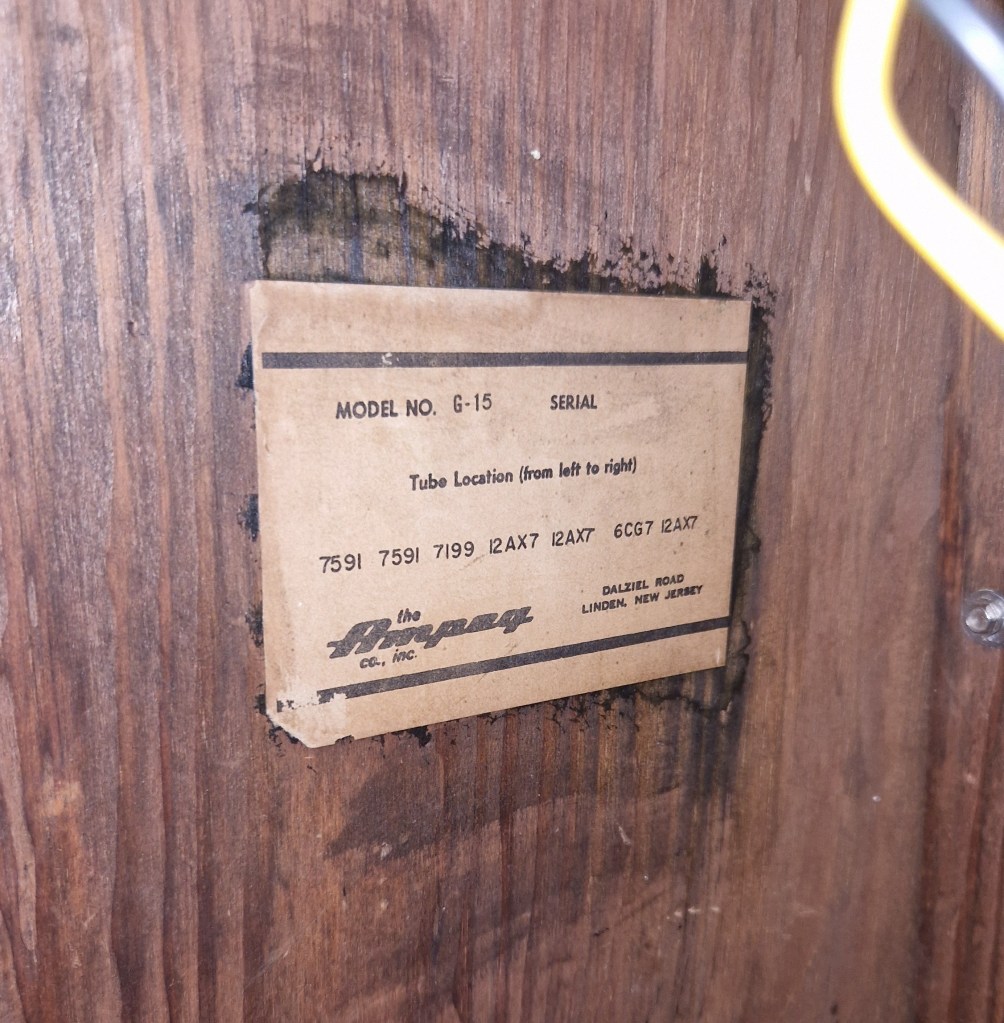
Ampeg produced a lot of nice guitar amps in the 60’s and this is one of them. The Gemini I was introduced in 1964 as a 22W deluxe amplifier focusing on clean output power. In the Gemini II the kathode biased poweramp was replaced by a fixed bias power section getting 30W of clean power into a single Jensen 15″ speaker (the amp was also available with a JBL speaker, called the Gemini IIL) with onboard reverb and tremolo (and a hidden repeat percussion). These features make this amp an absolute workhorse! Originally released in two versions this amp is a clear example of the first edition with the known 7591 tubes in the poweramp. A manual of the amp can be found on the Ampeg website.
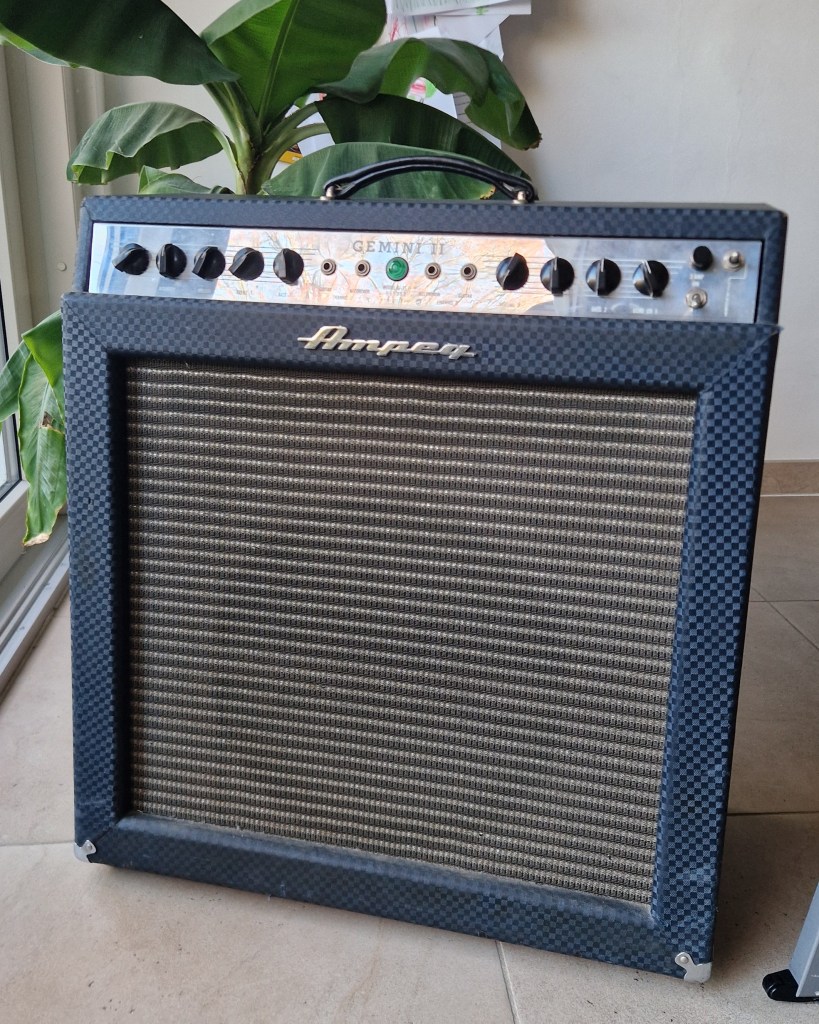
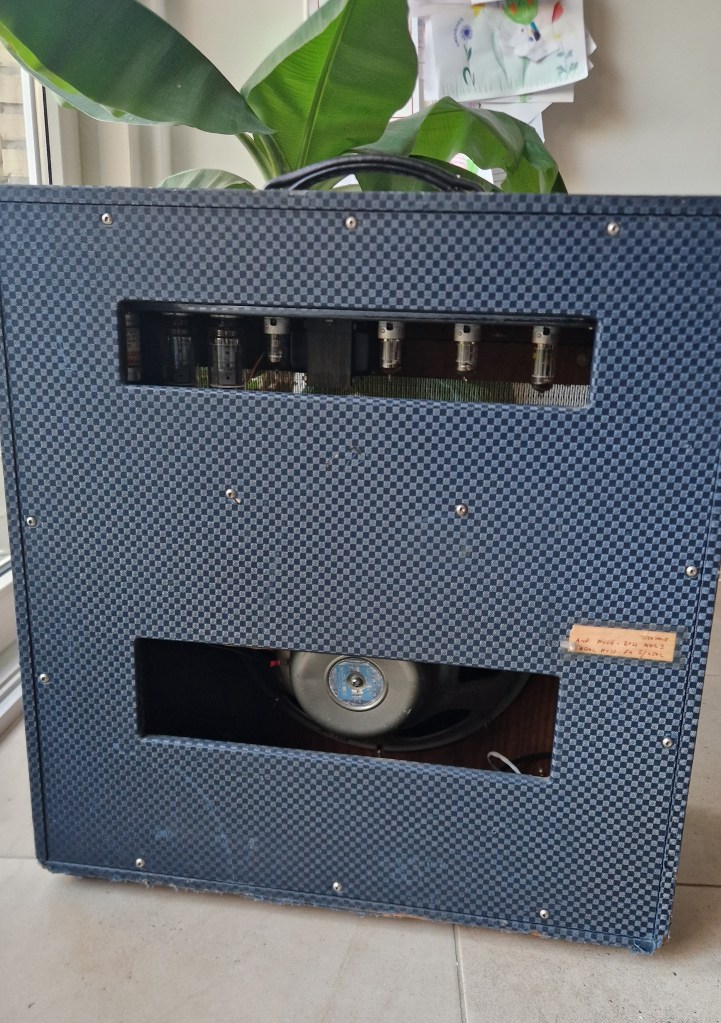
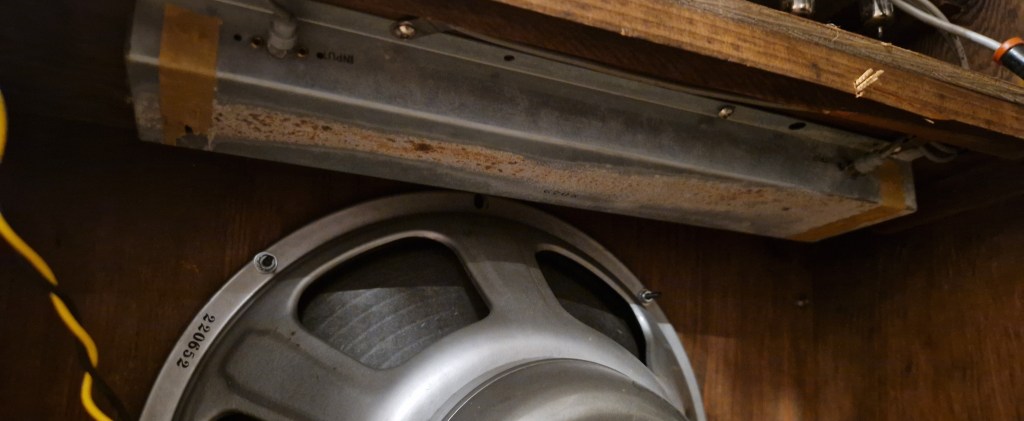
Ampeg introduced this amp as the first amp that had it’s controls facing forward but also introduced a ported cabinet design. In this design the speaker is in it’s own enclosure beneath the amplifier (fully surrounded by wood); the back is fully closed except from a small opening in the back acting as a port. Removing the back cover of the amp resulted in a different sounding amp altogether.

The circuit
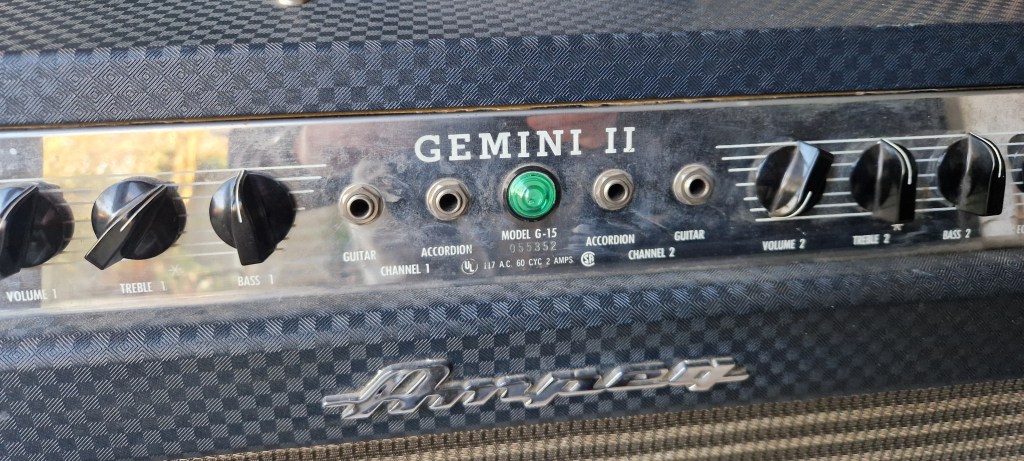
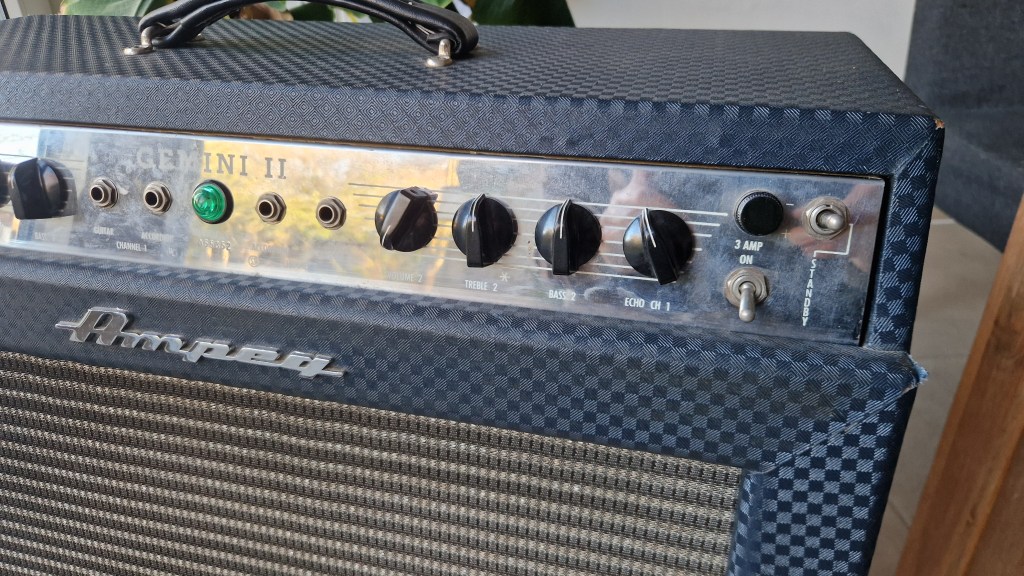
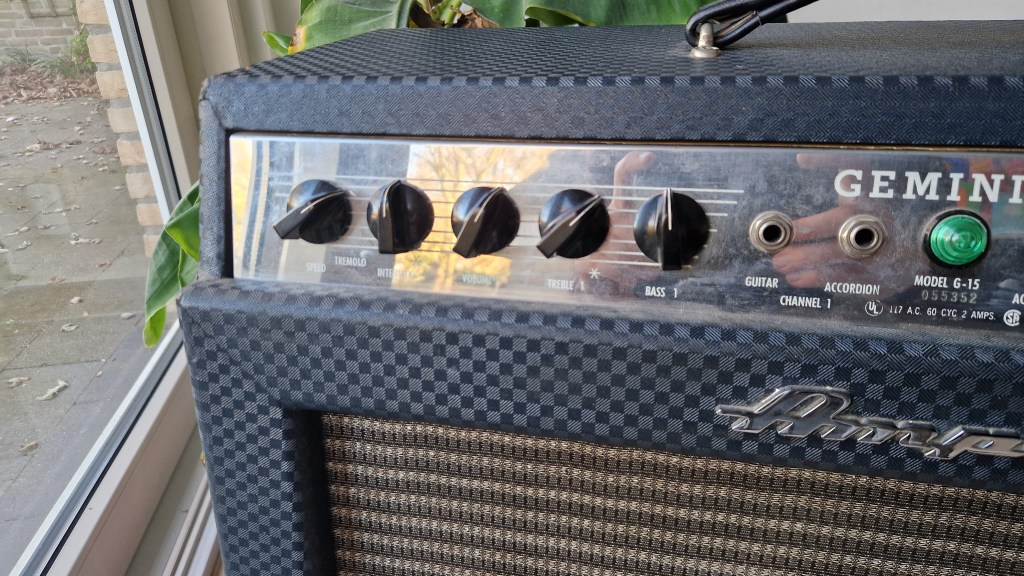
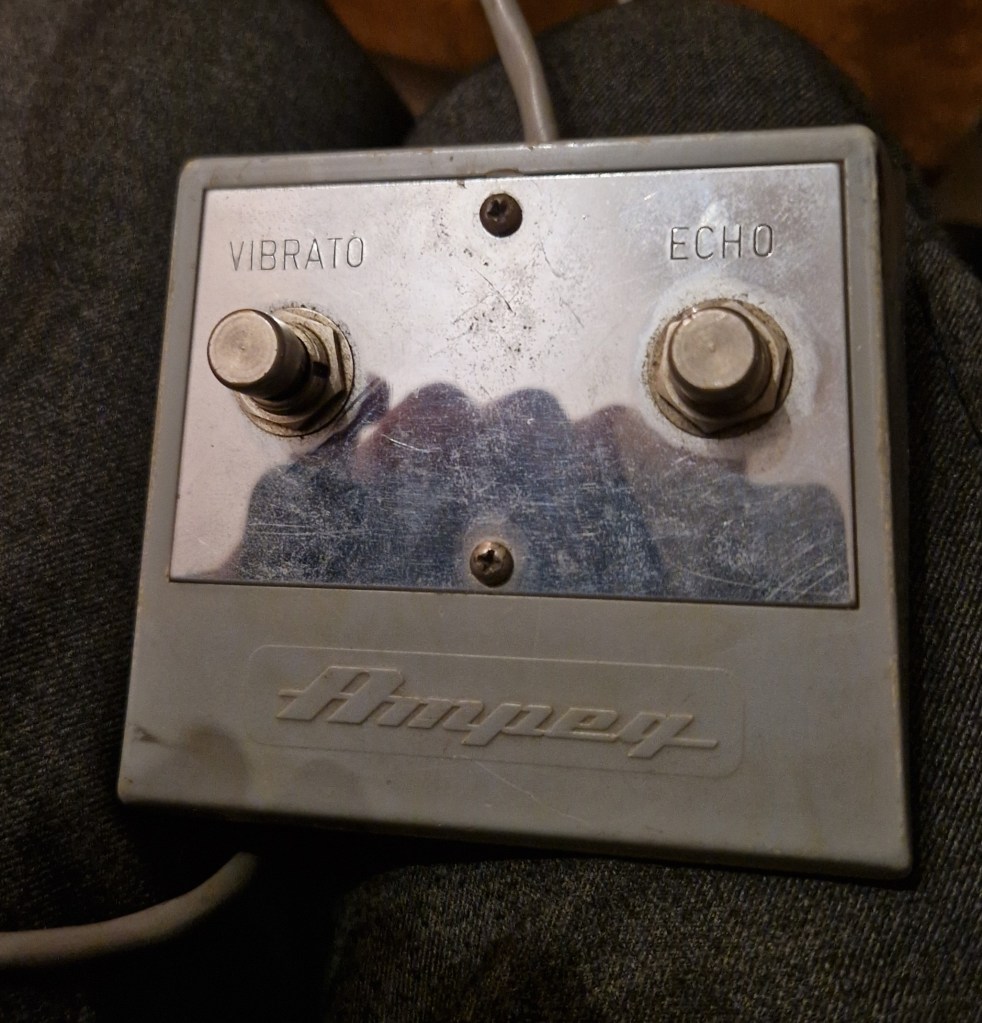
This amp looks amazing! It is heavy due to the HUGE speaker but the cabinet is made with decent and quality wood adding to the weight. The amp features two individual preamps (with individual EQ and volume knobs) each with an input for guitar (full input) and an input for accordion (padded input). Channel one features the onboard tremolo, reverb and repeat percussion effect while the second preamp has no additional effects for the clean sound vibe. The manual states that more instruments can be used per preamp but that this can cause a volume dip. The amp has controls for EQ (‘Treble’ and ‘Bass’) and level (‘Volume’) for both channels but channel 1 also has controls for the reverb (called ‘Echo’) and tremolo (‘Speed’ and ‘Intensity’ for speed and depth). Little stars on the chassis determine a switch; on the treble potmeters a switch is located at the most max position which switches a ‘Bright’ cap (making the channel even more brighter), on the tremolo’s ‘Intensity’ control a little star is present at the maximum intensity location. This switches the repeat percussion effect (some sort of drastic tremolo effect). On the faceplate a switch is located to turn the amp on and a second switch determine the polarity of the deathcap but also features a standby function in the middle position. I would advise you to remove the death cap and playing through a grounded power supply.
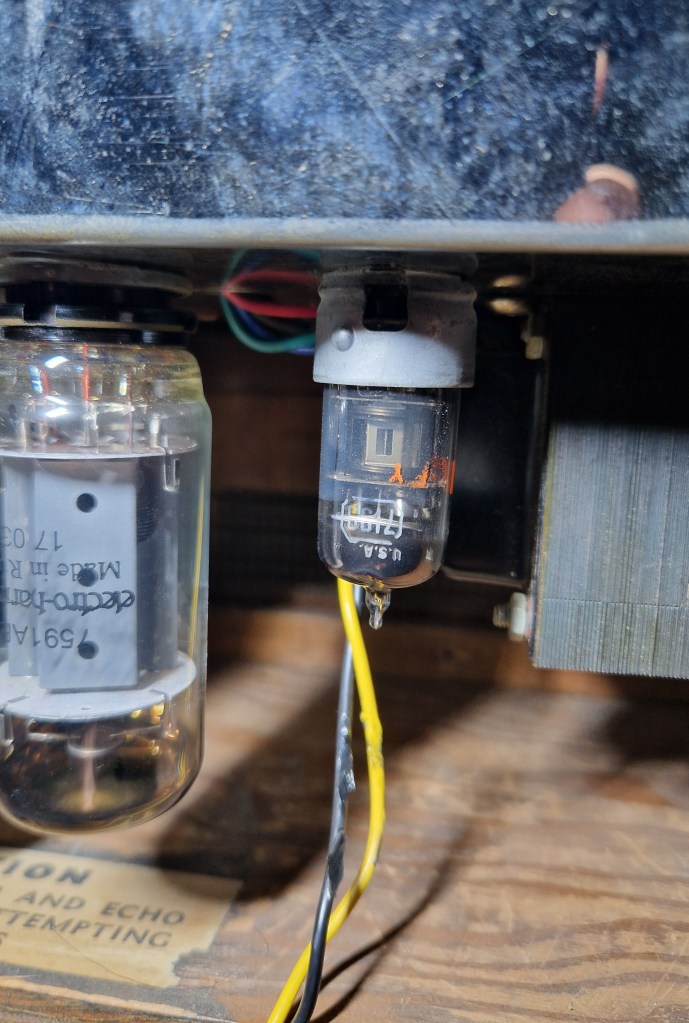
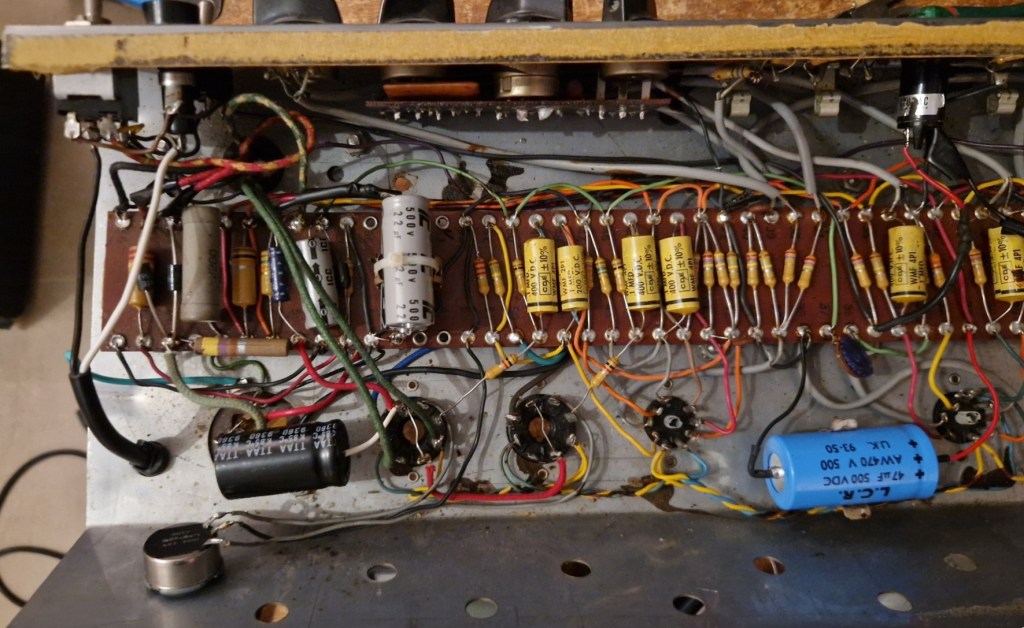
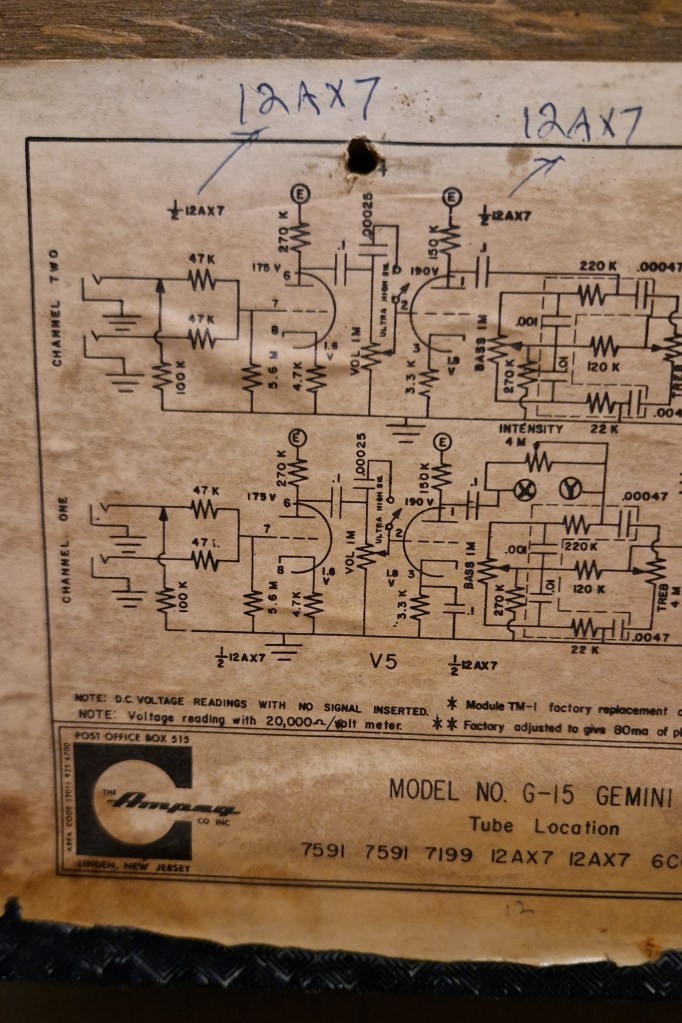
Opening up the amp shows this great 60’s Ampeg vibe. From the back the amp looks incredible with that enormous speaker, the hidden reverb tank (mounted upside-down) and the various tubes. Removing the backplate revealed the original schematic of this amp, something I am Ampeg grateful for. Removing the chassis from the amp was easy (no screws were used to secure it) and the inside oozes with vintage Ampeg vibes. A can capacitor is clearly visible underneath the chassis. Some electrolytic capacitors were replaced in the past. The cap on the mid connection of the heater supply was bypassed with a 10 microfarads cap where the original called for a 100 nanofarads cap. The death cap was already removed and a grounded plug was already attached to the chassis.

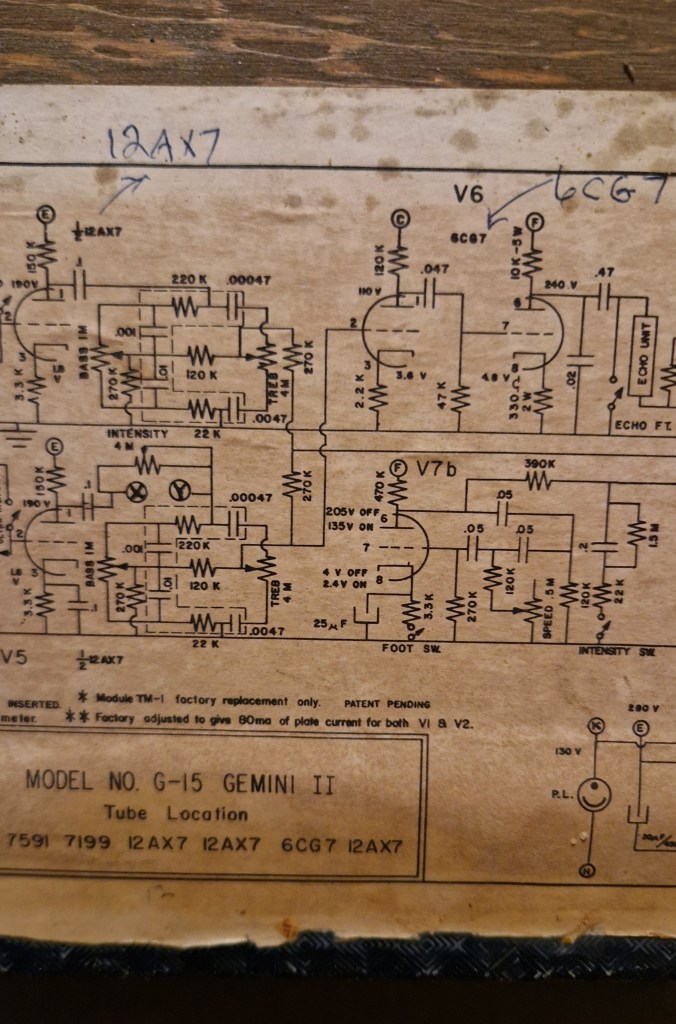
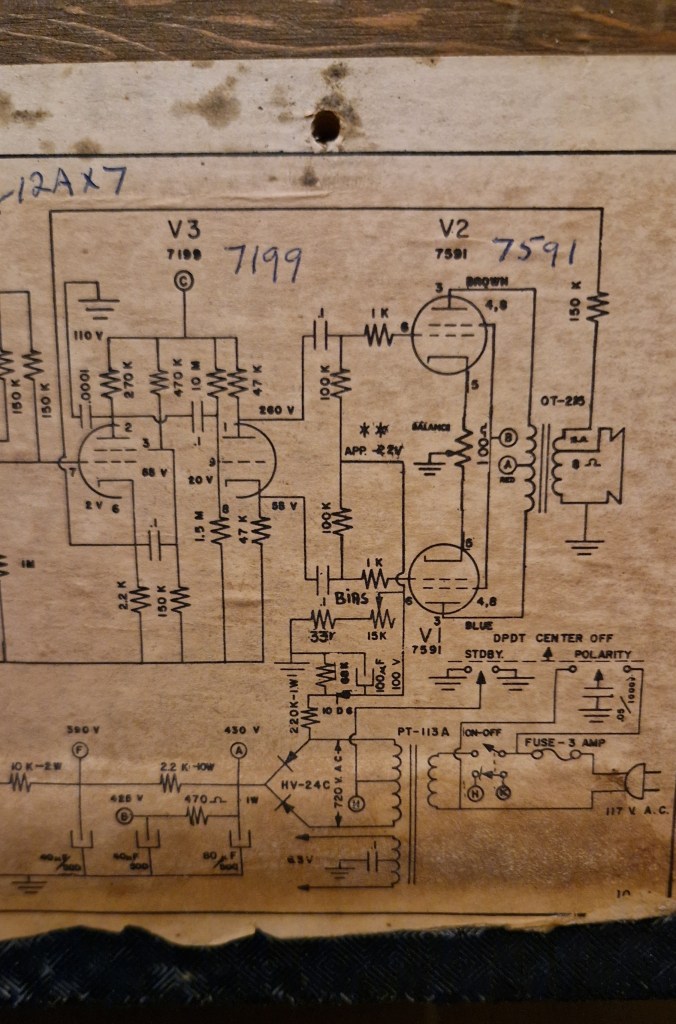
I checked the amp with the available schematic. You can find it online on the ampeg website.

This website‘s take on the circuit is really fitting:
Like that of so many other Ampegs, the circuit of this one looks little or nothing like those of the other popular amps of the day. Each channel has two stages of gain from its own 12AX7 preamp tube (so at least that’s a conventional replacement part!) with the Volume control sandwiched between. Bass and Treble controls follow the second of those gain stages in a configuration like nothing you’ll find in the classic Fender/Marshall/Vox topologies, but one that’s quite functional in the way that everything done by Ampeg seems to be. Also different from the common denominator is the lack of any cathode-bypass caps on the first gain stages of each channel, a component usually used to voice the tube, often fattening up the signal in many amps. Omitting this cap helps to keep things tight up front, an effort that in itself kind of hints at jazz intentions, but the added half of a 12AX7 between the Volume and Tone controls ramps it all up pretty good, and there’s a .1µF bypass cap on the cathode of the second gain stage of Channel 1, for a crispy boost of sorts. Channel 1 also gets the famously lush Ampeg reverb (labeled “Echo”), as well as an opto-cell tremolo that acts directly on the circuit between the second gain stage and the tone controls. In addition, each channel has an Ultra High switch on the treble pot that really lives up to its name; turn the knob fully clockwise until the switch clicks to engage a super-bright mode, which is definitely not jazz-certified.
The phase-inverter tube used in this amp, a 7199, is even harder to find than the output tubes, since none are in production anywhere today, and supplies of NOS tubes are drying up fast. But don’t panic – there’s an easy fix. Moving three wires on this tube’s socket lets it use a more-plentiful 6U8A tube in place of the 7199, for comparable – and possibly improved – performance. As for the phase-inverter circuit, Ampeg used a rendition of the split-phase (a.k.a. cathodyne) inverter with a driver stage in front of it, as employed in Fender’s 15- to 30-watt tweed amps in the late ’50s like the Super, Pro, and Deluxe, and the Princeton throughout the blackface and silverface years. This topology is prone to some clipping, and might be partly responsible for the Gemini II’s fat crunch when cranked up, so it’s a wonder Ampeg didn’t use a cleaner, bolder long-tailed pair inverter… go figure.Ampeg purportedly moved to the “new” 7868 output tubes because they were the latest upgrade from Sylvania to the 7591s they had previously used, and were said to be similar performance-wise. What might have seemed a propensity to predict which tubes would be difficult for future owners to acquire – and then go with those – was more likely just an effort to keep abreast of the latest tube technology, along with a drive to be different from the pack. If you want to get your own vintage Gemini II pumping on something more standard, and more readily available, a good tech should be able to convert it to use 6L6s, though that’s likely to alter its original voice somewhat (in ways we can’t entirely predict).
A final major factor in the Gemini II’s mojo is its 15″ Jensen speaker, which is mounted in a bountiful combo cab with a back panel that closes off more of the interior than most. The entire configuration serves to really fatten up a Stratocaster, and it positively roars with a Les Paul. This example, long enjoyed by VG reader Greg Mayo, is in sweetly clean condition, with an interior that’s mostly original other than a few necessary bits of maintenance. Hip, retro, and appealingly alternative, it’s a vintage piece worth hanging onto.
The fix
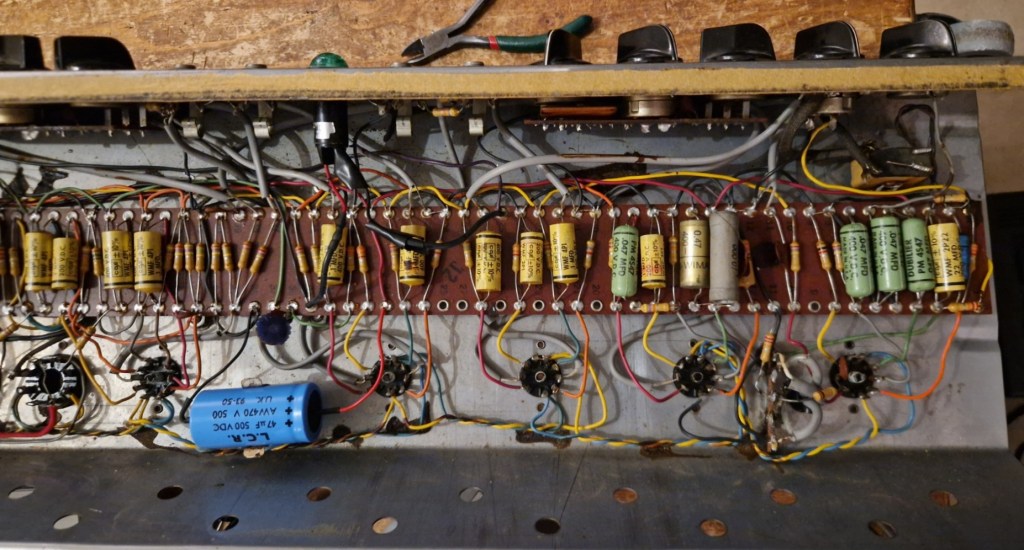
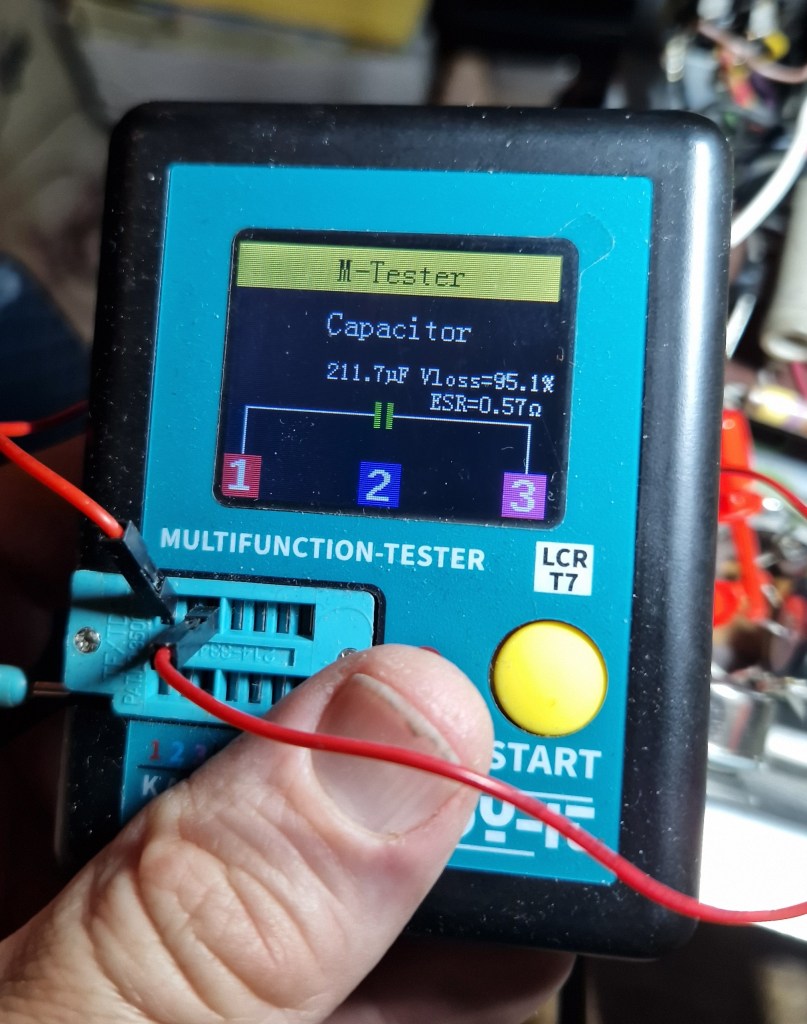
The amp came in blowing fuses. It was originally specified for a T, 3A fuse but inside was a (blown) F 5A fuse. Opening up the amp made clear that someone already partially serviced the amp but did a lousy job (looks like leftover capacitors that were soldered to the original leads of the old caps). Also the vintage can capacitor was still in the action although the former technician soldered both capacitors (in the can-capacitor two capacitors are available) in parallel thus doubling the capacity. Measuring all caps made clear that both the original and the newer caps were not well and needed replacement.
All diodes were shot and turned into resistors flowing AC into the DC line. The diode of the BIAS supply measured fine but did not function correct anymore: when the amp was in standby the BIAS voltage rose to -28V but when the amp was taken from standby this voltage dropped to -4V causing the tubes to work at 200mA, far above their specs. By replacing the diode this problem went away.
I kept the 100 ohm potmeter in place that matched the output tubes but as the output tubes were matched I made sure the difference between the lines was close to 0V. I added a single 1 ohm resistor (1W, 1%) to the wiper of this potmeter (as can be found here) and biased the tubes on 80mA (40mA each). This made the amp cool down, sound amazing and more reliable.
Now with a new T 3A fuse the amp functions like it should.
The sound
What is to say on this amp? It not only looks vintage, it sure does sound like it too! This amp is pure mojo. The available EQ (and EQ circuit) makes it stand out against most other guitar amps as it is has a firm grip on the mix. Yet, the available EQ makes it able to produce a wide range of sounds and the position of the ultra-high switch makes the channel transform into a huge penetrating madness (still with a decent amount of mojo). But why stop there? The reverb is lush and clear and works fine with the overal sound of the amp and the tremolo is wide, fat and swampy. The added repeat percussion is fun but limited in use.
I love the sound of this amp! And with me much more people. Now to return to the studio to be placed on so many records! Enjoy!
Links

Leave a comment